Showing posts with label Halloween. Show all posts

Friday, November 1, 2013

I made a deal with the devil...

     ...my eternal soul for exceptionally pliable hair. Not really, but since the underlying theme of this week's posts seems to have inadvertently become "look at all the weird things I can make my hair do," I thought I'd finish out the week with a post about possibly my new favorite hairstyle: cat ears. 

     Yeah, I said it. I made cat ears with my hair yesterday for a low-key daytime Halloween look, and realized I totally loved it, being the weirdo that I am. With some faux rolled Bettie Page style bangs (that I ended up liking so much I actually cut my hair into Bettie Bangs for real), it was kind of a 1950s Catwoman situation, but if Catwoman was like, swinging by the vet for more flea and tick preventative and running some errands along the way on her day off. 


     To make these ears, all I did was section off two small ponytails on the top of my head, then twist each one until it coiled a bit in on itself, pin down the little hair nugget it forms (real talk, it totally looks like a cartoonish little pile of poo at this point), then untwist the remaining hair, comb it smooth, and kind of carefully fold it around the base-nugget-thingy until the angle looks right for a cat ear, then pin and hairspray like currazy. And done! I thought this was such a fun style, and not just because it reminded me of a particular villain from the Sailor Moon episodes I loved as a kid (and now, I won't lie). 


     But let's be honest, total style icon material right there. 

Wednesday, October 30, 2013

That's why her hair is so big, it's full of secrets.

     Alright, I promised you a post detailing that insane Zuul hair, so let's get right to it. As I mentioned before, the method I went with was essentially just rolling itty bitty rag curls all over my hair (using this tutorial) after slightly dampening it with a spray bottle of water and running some volumizing mousse through it. The first time I tested it out, I rolled them all myself while watching an episode of Blue Planet. The night before the Halloween party, though, I asked my mom and Amanda to help, since I've been sick for seemingly forever and my arms would have gotten too tired (if you're wondering how I reconciled those two things -- being sick and a Halloween party -- it's because I was the designated driver, so basically all I had to do was go look cool in my costume and be sick in a different location). By the time they finished, I looked like this. 

Hands over the face in shame at the thought of letting people see me with this mess on my head. Also, I didn't have makeup on.
     All told, I think it took a total of around 2 hours to get all those teensy rolls in there. So then I slept on it, and in the morning, the Zuul hair we all know and love was born. The rolls obviously come out a lot faster than they go in, but it still took a while to unroll them all and fluff them up a bit. I kept fluffing it up throughout the day, because at first it was looking a little too Weird Al for my liking. Pictorial evidence!


     You can tell in that picture that a) I'm full of totally original and hilarious ideas and b) the rolls toward the bottom of my head were looser and done with bigger chunks of hair because my helpers were getting tired of rolling by that point. I don't blame them, it's hard work and I was grateful to have them. But after some hairspray and finagling it looked just fine. That hair really grew on me (HA), by the end of the day I was actually starting to feel like it was kind of a hot look. 

     When it was time to return to my normal hair, I sprayed on some leave-in conditioner/detangler and settled in with a brush, expecting the worse. I was surprised to find that after a good brush, it wasn't bad at all. I put it in a braid for the night (which I do most of the time anyway, since when my hair is this long I sometimes feel like it's gaining sentience and trying to strangle me at night if I leave it down, real talk) and in the morning it looked like this. Warning: this is the part where a lot of you are going to make a scoffing noise and say "ugh, this bitch and her hair," because as I have learned, my weird magic-trick hair that pretty much just does whatever I ask it to has a way of making people angry. 


     So the final verdict here is that if anyone wants to try this method for their own Zuul costume needs this Halloween, or for some other big-haired costume (I spent much of the day swanning around in high-waisted shorts feeling like a '70s disco roller girl), or if you just feel like you want to occupy as much physical space as you possibly can, go for it! It's time consuming, but the results are killer, and it didn't damage my hair at all or make it impossibly tangly at all. 


Monday, October 28, 2013

Don't Cross the Streams

     Well, the weekend Halloween parties have come and gone and now it's finally time for me to show you my finished Zuul costume! Drumroll super '80s synthesizer beat please...

I'd like to take this opportunity to remind you I wore a slip under this dress, so you're not seeing anything untoward here, I promise. 

     And of course, after spending that much time working on my demonic contouring, you know I have to include a close-up, and being the person that I am, obviously I'm gonna have to add lightning and an end-of-days-esque filter...


     This was so much fun to do. The hair was floofy, the dress was slinky, the makeup was over the top, and I was shimmerier than a disco moon (rarer than a blue moon, a disco moon happens once every couple of decades when funk music makes a comeback. The more you know!). 

     I hope you guys enjoy this epic tribute to a seriously classic movie, and I also kind of hope I'll somehow start a trend here. Every Halloween there's always a ton of Ghostbusters running around, but no Zuul! It's a crying shame! 


PS: If you're curious how I got my hair (yes, that is my actual, real, growing-out-of-my-head hair) to do that, how long it took, and how I turned it back into my normal hair again, stay tuned for Wednesday's post! 


Wednesday, October 23, 2013

Spooky Sticks

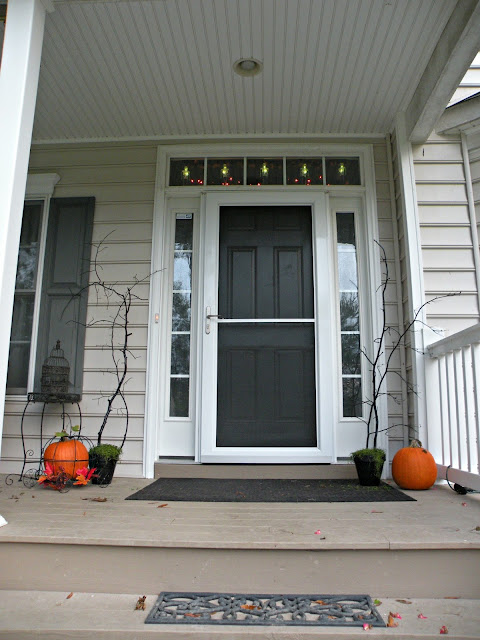
     I figure I should really be cramming in any last minute Halloween ideas now since it's rapidly approaching, so today let's talk about another quick, easy, and cheap decoration that you can whip up, once again using my favorite free resource: sticks! The inspiration for this was found at Target, where they had a similar set-up going for $25 dollars a pot. That's fifty bucks to bookend your front door with some creepy looking sticks. No thanks. Here's what you do if you're feeling like not paying for fancy landscape refuse:

1. Collect some nice branches. 

2. Spray paint them black. 

3. Add glitter if desired.

4. Place in a black pot at desired angle of stand-up-ness.

5. Spray foam the shit outta it. 


6. Cover that however you so desire. You can paint it black for a swamp witch look...


... or slap some moss in there for a slightly less oil-spill-ish appearance (although really, what's scarier than environmental disasters?).


     Pretty Halloween-appropriate, yeah? It probably adds to the scary factor that I've been sitting on my bed by the window, zonked out on cold medicine and rocking a sickly cast that really takes my natural paleness into full on restless spirit territory, so I'm sure anyone driving by has been thoroughly spooked. 


Monday, October 14, 2013

Oh-ho, Zuuly you nut!

     And the Zuul dress is done! The sleeves were cut in according to the diagram in Part I, then finished off with some elastic, and it's got a much better shape to it now. Of course, it's not supposed to have too much of a shape at all, but there's a good amount of middle ground between "potato sack" and "Real Housewives-style bandage dress."  


     I included two slightly different angles there just so we can all appreciate the pretty shimmer of that fabric combo. Preeetty. 

     The slit is also new since the last update. Obviously the original Ghostbusters dress has a much higher slit, but I'm not too keen on the idea of accidentally flashing my underwear to the world, so mine's shorter. You'll also notice the dress is pinned onto the dress form on one side. That's because she's got no shoulders to hold it up (don't bring it up, she doesn't like to talk about it). It'll stay up better on me, due to my possession of a set of arms. If I feel like it's falling off, I'll just use some double sided tape to hold it in place. The only other real change I made to the design (in comparison to the movie version) was to make it a bit shorter, so it hits just above the knees. That's entirely a personal decision, just because the original hits mid-calf, and I happen to know that that length would do me absolutely zero favors. So it's just to make it a bit more flattering. 

     The final update on this will be when I put the whole shebang -- the dress, the mahoooosive hair, and the extreme '80s contouring -- together to wear out for Halloween, so be sure to keep an eye out for the big reveal!


Friday, October 11, 2013

Whoa.

     Ok, so the method I was testing for my Zuul hair...um, it works. 

What's scarier, my hair or the fact that I'm so pale I'm practically the same color as the wall? And there's no filter on this picture, either. I'm just naturally spooky. 

     Yeah, that's easily the biggest my hair's ever been. Basically all I did was cut an old t-shirt into small strips and tie approximately one million teensy little rag curls in my hair, then leave it overnight. It took a really long time to tie the rag curls in, but I think the results speak for themselves. I could sleep literally anywhere with this hair, for my head had a built-in pillow. I could hold small objects in there with no assistance -- car keys, ID, maybe a granola bar. 

     I'll definitely be using this method for Halloween. Hopefully next time I can get someone to help me tie in all those curls though -- my arms got tired by the end!


Monday, October 7, 2013

There is no Dana...

     The day has come! It's time to reveal my devious plans for Halloween, since I've finally gotten my act together enough to start working on it. My Halloween costume is...


     Dana Barrett (as possessed by Zuul) from Ghostbusters! I'm super excited to finally do this for Halloween, since I've been saying I wanted to for years. 

     I bought the two different types of fabric I showed in my sneak peek post knowing that there was never going to be one single fabric that matched the Zuul-y gloriousness above, and I was going to have to layer for authenticity. I could have just found a shimmery orange and it would have been passable, but I'm not aiming for just passable. If I'm doing Halloween, I'm doing Halloween all out. The shimmery shade-shifting fabric, underneath the orange sheer fabric, creates the perfect combination. The only drawback is that they're both sheer fabrics, and two sheers do not make an opaque (though it's not super obviously sheer, either). So I'll be wearing a nude-colored slip underneath my ensemble just to err on the side of caution and covered skivvies. Anyway, here's my plan of attack for this project. 

This picture also illustrates how surprisingly well those two fabrics layer to get the desired effect. In the picture above, the lining looks gold, but in other shots you can see it's really a much darker silver/purple/green color that just gives a hint of shimmer when it peeks through.
     
     First I spread the fabric out in the floor, doubled, and stared at it for a while. Then I asked my mom to please come help me before I destroyed everything, because I wasn't sure how to go about achieving my vision here, so I needed her advice, and also because I have a bad track record with specialty fabrics and didn't want to ruin the limited amount I had bought for this, only to go back and find out it was gone and I couldn't buy anymore and all my dreams would crash down around me. Point being, I ruin specialty fabrics sometimes, so I asked her to do the actual sewing for me, since she's got way more sewing know-how and experience than me. No shame in asking for help when you're out of your depth!

     Once that important step was out of the way, we came up with the basic plan you see above. The top is on a fold, and the bottom edges have been sewed together (so it's four layers of fabric, orange and shimmer sewed together, then another orange and shimmer together) so that it can be treated as one swath of fabric with a hem already in place. From there we cut off a strip along the side, on the fold, that will become a sash/belt. Then we guesstimated a size for the neck opening; I tried it on and we ended up making it a few inches wider anyway. Now, for my purposes, we ended up cutting along the top (where the neckline goes) all the way across after cutting off the sash piece, then re-sewing the dress at the top of the sleeves and finishing the neck opening with a small hem. But that's just an option, you could just as easily leave it on the fold and only cut out and finish the neckline. Different strokes and all. 

     The body of the dress is going to be formed by cutting out and sewing a Dolman sleeve onto a basic tunic shape that's intentionally left quite loose and wide so it can be gathered by the sash. I say "going to be" because after the intense planning stage and the surprising amount of time it took to get the fabric flattened out, trimmed into even pieces, sewed together at two ends, turned out right and ironed, and cut and sewn into the basic formation (both of the fabrics are quite clingy and finnicky, and the shimmery fabric tends to roll, which makes the whole thing kind of a nightmare to even get laid out evenly, honestly), my mom and I both agreed that we'd made a respectable amount of progress for one night. But you know I couldn't leave you without another preview, so here's how it looks draped on the dress form right now, just to give you an idea of the direction it's headed in. Obviously, since the sides haven't been shaped at all, it's rather bunchy right now. But it'll turn out brilliantly, I'm sure. I have faith in the powers of Halloween magic! Ok, and in my super helpful mom. 


     This picture also helpfully illustrates why I'm opting to wear a slip underneath. In real life, this looks fine. But add flash photography and suddenly you're untagging yourself in every Facebook photo you can find because oh hi, there's your underwear.

     I'll be keeping you updated on any progress as it's made on this project, including when I road-test the method I'm thinking of using for getting crazy-big, frizzy, ultra-80's demonic possession hair. I am beyond excited for that. Note: not sarcasm, I seriously cannot wait to push the limits of exactly how much space my hair can occupy. For science! And my own amusement. 


Friday, October 4, 2013

Halloween-ing the house!

     Halloween is rapidly approaching, and around here we're spookifying the house in preparation. Here's a quick, easy, and cheap way to bring a little creepiness into the home (I say this as a total hypocrite -- I can practically hear Morticia Addams saying "...but Debbie....pastels?" every time I walk into my room. Oh well. Split personalities for the win!). 

Step 1: Raid the woods. 

     Take a walk through your local foliage and collect some nice twisty twigs. Try your best to keep them away from your giant dog who is comically obsessed with sticks. 

As a side note, this picture reminded me of a children's book my mom used to read to me that had ragdoll children and they had to go through a thicket at some point and it wasn't supposed to be scary but I always found it tremendously upsetting for some reason (I still get anxious thinking about it) and now I can't remember what it's called and I can't find it on Google and I've been looking for over an hour and I'm worried it may just be a manifestation of my anxiety that I invented as a child and it's not a real book at all and I'M FEELING VERY AGITATED is what I'm getting at.

Step 2: Paint it black. Then add glitter.

     Throw down some newspaper or a dropcloth or what have you and hit the sticks with some black spray paint. Then, while the paint is still wet, sprinkle some glitter on top. 

I wish I'd seen that smudge on the lens earlier. Let's just pretend it's a ghost, in the spirit of Halloween. Oooh, a lost soul who wants me to have poor quality photos -- scaaary.

Step 3: Arrange fittingly. 

     These particular sticks were destined to become a nest for this fine fellow here.

    
     And of course I couldn't resist a spookified version:


     And done! Easy peasy, lemon squeezy. The best part about this little Halloweenification is that you don't have to worry about storing this from year to year. It takes a tiny smidgen of spray paint and glitter that you probably already have, and sticks. You can't get much cheaper than free, so go ahead and toss them when the season of creeping is over.


Friday, September 27, 2013

Halloween Sneak Peek!

     I know that for some people it's still way too early to think about Halloween, but not me. This is partly because Halloween is one of my very favorite holidays, but mostly out of necessity. See, when you insist on being something weird and making your own costume because it has to be authentic, you have to start planning pretty early on. You can't just run to the store at the last minute to pick up a costume if you're gonna be zombie steampunk ax-murderer Minnie Mouse or what have you. So I'll be keeping you updated along the way as I put together this year's costume, but for now I just wanted to give you a little sneaky peeky to see if you can guess what I'm scheming.


     I don't think it's that hard to guess, but then...I already know the answer. If you're stumped, don't worry, I'll be back to show you how it's going soon!