Showing posts with label recipes. Show all posts

Tuesday, September 22, 2015

Veggies that are actually...tasty? What a world.


I am not a veggie lover. I'm that absolute catastrophe of a human who'll pick the carrots out of a stew or eat around the broccoli in a casserole. I can tolerate raw veggies a little better (dipped in ranch, obviously. What, you thought I was an actual functional grown-up, snacking on organic natural free-range unseasoned broccoli? Nah homes. Drench that shit in man-made sauce that's only even edible by the scantest of standards, then we'll talk), but it's still not something I'm gonna get excited about.

BUT. Since I got all married and settled down and junk, I figured I could stand to work a little more on being a respectable adult. That means making healthy meals a little more often. Gotta balance fun treat-yourself foods with the things that'll actually keep you alive and healthy and not riddled with vitamin deficiencies. Which leads us to a recipe I tried the other day. It was pretty ambitious, you see. It's not your average broccoli with cheese recipe. No no. It is....cauliflower. CAULIFLOWER. Arguably the least sexy of all vegetables. It even looks like broccoli's weird shut-in cousin that had polio as a kid and can't do much now and really lets it define him, you know? 

Hopefully I haven't lost you already, because I swear I'm gonna bring this back around. You know what makes almost everything tastier? Buffalo sauce. Yeah, we're talking buffalo cauliflower. The recipe I used was this one here, which I found on Pinterest. Admittedly, I was mostly making it for Chris. That weirdo likes cauliflower to begin with. So I figured it didn't really matter if I liked it or not, he'd probably eat it and pretend to enjoy it for the sake of my ego. 

But it was actually...good. Really good. Like, "would make it again of my own free will" good. Just look!


If you squint your tastebuds you can almost pretend that's cheese! Just kidding, it doesn't taste like cheese. It looks like it though. These actually taste very, very similar to chicken wings, just with the tiniest bit of cauliflowery taste at the end of each bite. But the flavor is very mild, and the texture is pretty spot on. It was really easy to make, too. Only took about 20 minutes, and even that's because I insist on doing things the difficult way, like chucking all the cauliflower into the batter at once and just mushing it around with my hands in the too-small mixing bowl (the recipe suggests dipping the pieces individually, but that sounded like more than my attention span could handle).

The end verdict? Chris loved it (heard him raving about it on the phone to his brother later that night). I was surprised that I actually liked it. Two thumbs up, would cook again!


Friday, September 5, 2014

When I dip, you dip, WE dip!

     If you don't immediately have that song stuck in your head then I don't even know what to do with you.Weep for your lack of turn-of-the-century cultural awareness, I guess? Anyway, since football season has started it's the time of the year where I finally have an excuse to try out ridiculously indulgent recipes all the time. Because food and football go together like...well, like food and football. Pretty straightforward, honestly, I don't think we really need a simile there. So here's what we had for the first Packers game last night: DIPS. 


     Apologies for the less than stellar picture, but I was really excited about eating these things. From the left, we have jalapeno popper dip (recipe here), which I've made before and could already confirm as delicious, graham crackers, pretzel sticks, and crackers for dipping, then peanut butter cookie dough dip up top (recipe here) (holy shit it's good. Especially with pretzels), and finally, white pizza dip (recipe here). The cookie dough dip, I actually ruined the first time around. When it says dissolve the brown sugar in the butter, they mean JUST BARELY. I left it on the heat for way too long, I guess, because it turned into a rather sweet-smelling door-stop. But on the second attempt it was totally fine and turned out stupid-tasty. 

Wednesday, August 6, 2014

PIE.

     Basically what we have here is me forgetting that it was Tuesday, and on Tuesdays I generally write a post for Wednesday, until like 2:00 am Wednesday morning. Oooops. So upon realizing that I had nothing planned, I flipped through pictures on my phone looking for something mildly interesting to show you. And look! A pie I made but never told you about! So sneaky of me. Such stealth. At least I think I never told you about it? If I did just pretend I didn't. Not like having to look at pie more than once is a huge inconvenience anyway, right?


     It was even more amazing than it looks, if I'm honest. Like I made it for a cookout at Jen's house, but then regretted not just making it and keeping it all to myself. That good. 

     HERE is the recipe I used if you want to make it yourself (and I do recommend that you do. Only for yourself though. Sharing is overrated). 

Friday, May 23, 2014

Mac and cheese smackdown (Mac-down? Just go with it)!

The time has come! To compare all the boxed macaroni and cheeses! Only one shall emerge victorious in these hunger games (see what I did there? eh? eh?)! 


     First, some ground rules: everything is kind of held against the standard of regular Kraft mac, because it's the American standard and whatnot. Also I didn't take calories or nutrition into account because I feel like if you're making mac and cheese health is obviously not your top priority, you just want delicious orange cheese-product. SO! Let's get to it. 

In one corner: NEW! Goldfish mac & cheese (cheddar version)


     They have other flavors of this, one of which I believe is pizza, but that's disgusting so no. We're sticking to basics here. If you want some horrifying bastardization of a classic, by all means, try the pizza flavor.

     This one wins points at least for having a cartoon on the back, so that's kind of fun. Unfortunately I think that's where the point-winning ends. 


     This picture obviously had the lens all fogged up from the steaminess of the mac, but I picked it anyway because it makes it look better than it actually was, and I'm charitable like that. This was...not great. The holes in the goldfish-shaped noodles close up once the noodles expand, so there's nothing to grab the cheese. There's a reason macaroni noodles are shaped like that: it holds cheese inside! So this ended up being a lot...noodlier tasting than I'd like. Also the cheese sauce wasn't great. If you think Kraft cheese sauce tastes artificial, try this and report back to me. Your stance will have changed. This sauce tasted like an approximation of cheese flavor, as engineered by a lonesome scientist who has never tasted cheese before and wants to punish those who have. I mean, real talk: it wasn't so bad that I didn't eat it. Amanda and I agreed that it kind of got better the more we had, sort of like tequila.

FINAL VERDICT: Doesn't compete with original Kraft mac. Is food in the technical sense that it will prolong your life slightly if you are starving to death. Thumbs down, would not eat on purpose. 


In the opposing corner: Betty Crocker Mac & Cheese (original)


     No cartoons on the back of this one (boo, hiss), but they do tell you all about how they do box tops for education, so...yay I guess? I dunno, I feel weird about the box tops program because I think it's kind of messed up that they'll only give money to schools if you send them a portion of their mangled packaging, like when a kidnapper sends the cops one of their hostage's pinky fingers to prove they've got them. Like, how about you just give schools money because obviously you have some to spare since you volunteered for this program anyway, then put on the back of your box "We're not a bunch of greedy bastards, we gave money to support education without having to have it extorted from us through old-school mob tactics" and then I'll buy it because hey, there's an attitude I can get behind. But whatever. 

I kind of want to make this my wallpaper? I dunno, I have food feelings.
     This one tasted pretty much exactly like Kraft. The amounts of butter and milk are the same, even. It had a little less of that day-glo orange Kraft has that makes you feel like if you ate enough of it you'd probably get radiation-induced superpowers, so that's either a pro or a con depending on your worldview. It brought me back to my childhood spent eating noodles that Jennie had flung at the wall (if they stick they're done) and having contests to see who could swallow the biggest bite without chewing (she was a great babysitter; I still have to consciously force myself to chew sometimes). 

FINAL VERDICT: Pretty good. If Kraft does something stupid and horrible and you have to boycott them, this is a totally passable substitution. I hope that doesn't happen though because they'd actually be kind of impossible to boycott; Kraft owns EVERYTHING. They're the Google of the supermarket. One thumb up, would eat if someone else made it and I didn't have something else in mind already. 

In...another corner? How many corners are supposed to be occupied in this analogy? Oh well: Kraft Macaroni & Cheese (Thick and Creamy)

    I didn't actually get around to making this because after the last two trials I was kind of mac'd out and felt like I should eat something for dinner in which none of the first five ingredients were "color." Color is not a food. Color is light interacting with your eyeballs. It has no nutritional value. You cannot eat color. 

     That said, I've had the Thick and Creamy Kraft dozens of times before and it is easily the best boxed mac you can buy. It's exactly what it says on the box: thicker and creamier than the original. The noodles are bigger and you don't end up with that three tablespoons of weird orange water at the bottom of the pot. It's probably even worse for you than the original somehow (I don't really know how, you don't add more milk or butter than the original, and the cheese is still just a packet of astronaut food, but it tastes more caloric somehow). It's also more satisfying to eat because of the bigger noodles, I think. 

FINAL VERDICT: Ultimate comfort food, a win for being super delicious but still really fast and easy. Two thumbs up, elicits "MAN YOU KNOW I WANT SOME MAC AND CHEESE" response when asked to partake. 

BONUS ROUND, let's mix all the metaphors! 

     If you want the best mac and cheese around, you'll have to put in a little more work. This recipe is the best, best, best macaroni, this is it. I make it for cookouts and special dinners because people ask for it all the time. It's got all the goodness and creaminess and cheesiness of boxed mac, with the added texture and flavor of gooey melted cheese on top. It's also a lot more substantial -- sometimes with boxed macaroni you eat a bowl of it and then go "That...was not filling." This stuff will fill you up. If you're a lover of mac & cheese, you absolutely have to try this recipe sometime. You'll thank me later! 


Monday, May 5, 2014

Cinco de...well, no, not really.

     As you are probably aware, today is the 5th of May, aka Cinco de Mayo! While as a person of your typical hodge-podge European descent I have no cultural ties to the holiday, I observe it in the same way I would any other holiday belonging to a group I'm not a part of. Kind of a general "Cool, that's cool." In this case, "Good for you Mexico, I'm glad things came up your way at the Battle of Puebla and you eventually won independence. You do you." A friendly hat tip and I'm on my way. That said, though it's not my holiday, I got a ton of emails from various recipe newsletters saying "MAKE THESE DELICIOUS-LOOKING THINGS FOR YOUR CINCO DE MAYO PARTY!" and I'm only human, so it did make me want Mexican food. Here's some of the recipes I tried out!


     For the main dish I picked these spicy pork kebabs, which were delicious. They were served with homemade guacamole, pico de gallo (store-bought because I didn't want to stand around chopping things for that long), and warm tortillas, so you could just unskewer the kebab directly into fajita-town. Mmmm. 

     Then I made some grilled corn inspired by this recipe. I say "inspired by" because I mixed up the mayo mixture that it talks about, but then forgot about it while I was cooking other things and playing with Ollie and Evie, and I let it sit on the counter a little too long. I wasn't sure if it was ok or not, but I've already been sick more times this year than I'd like, so I wasn't about to risk it. I just used butter instead, grilling the corn then buttering it before rolling it in the crumbled cheese. This one got good reviews from the family too, but then, it's corn with butter and cheese. How could it not. 

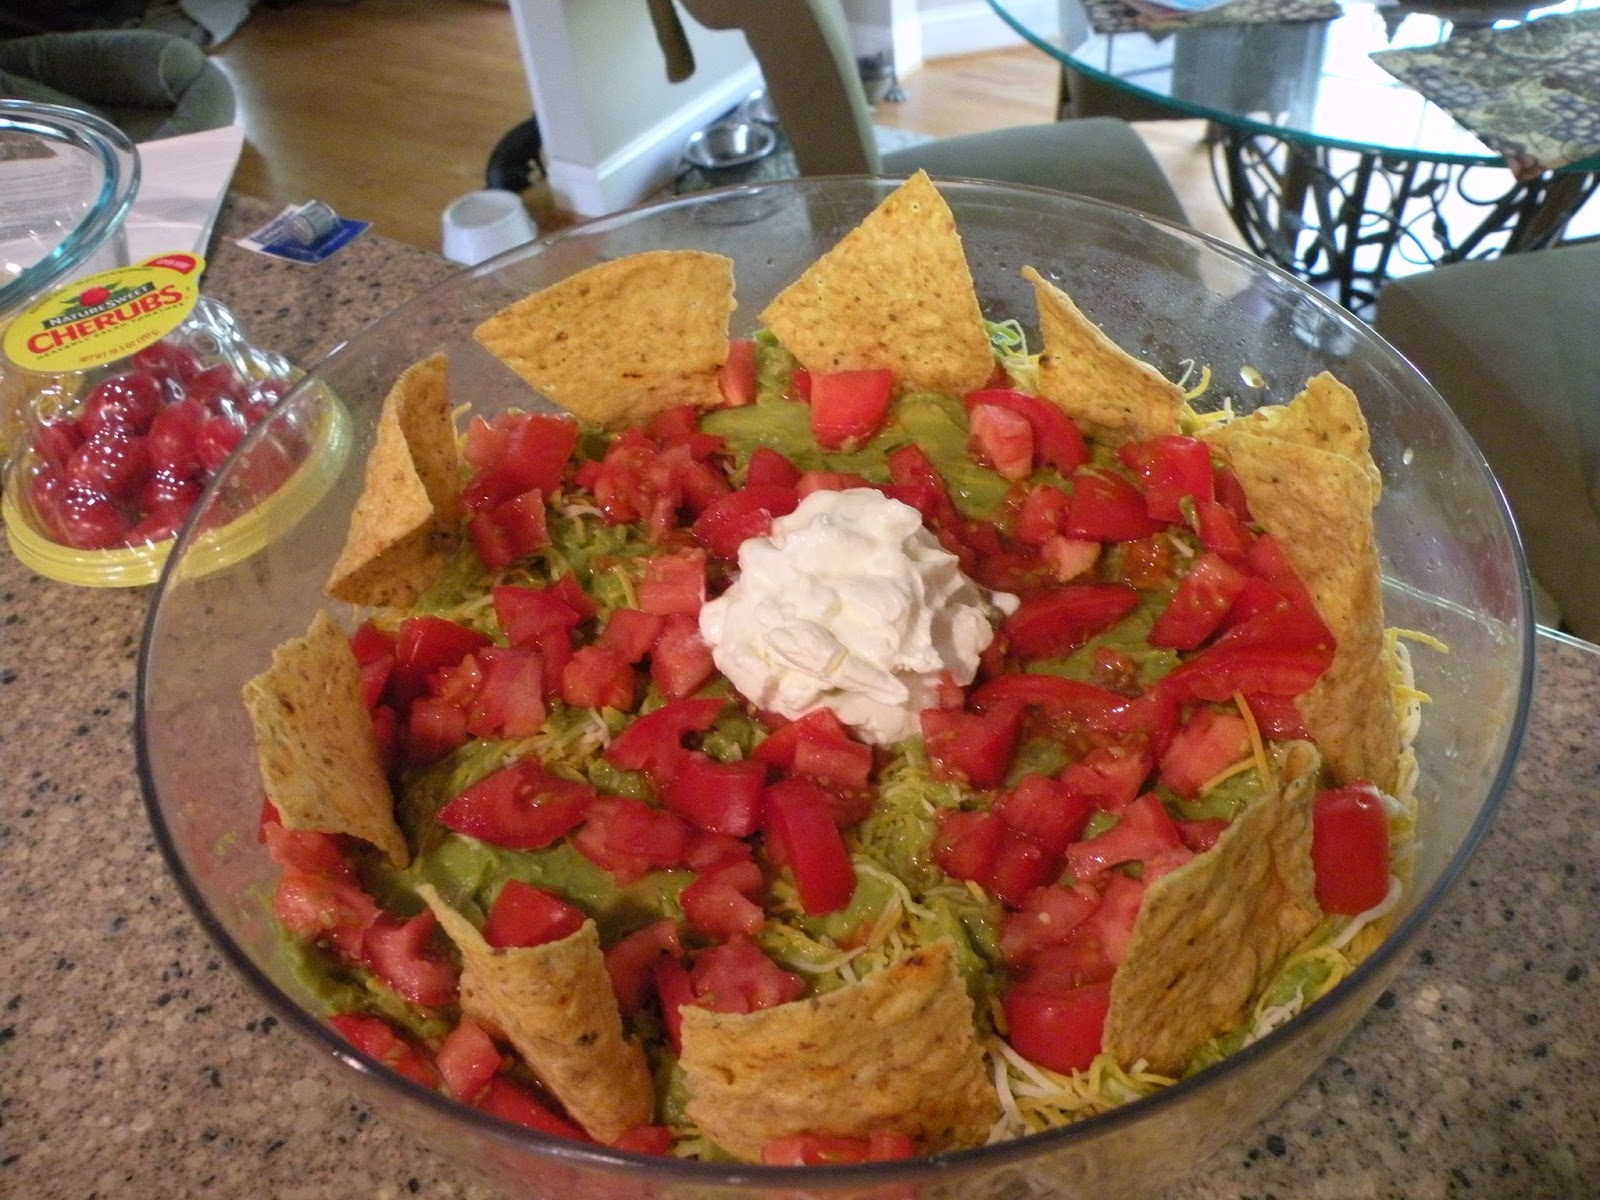
     I also assembled this glorious-looking "salad", which is only a salad in the loosest definition (it does have a layer of lettuce).

Side note: Why are these grape tomatoes called "Cherubs?" Are they trying to tie in with "Halos," those little clementines? Dear marketers: I don't need my produce to be spiritually superior, you can take it down a notch.  

     And I can't forget the appetizer, which was this tasty tasty dip


     I wanted blue tortilla chips like they have in the recipe picture, because those look delightful, but I live in an area where the only chips you can buy are official partners of NASCAR, so it was not meant to be. 

     Thus ends our feast! All these recipes were winners, but particularly the marinade on the kebabs and the dip (but I'm biased, I love all forms of dip. Except if you're including in that the sort of slang term for chewing tobacco because OH MY GOD THAT IS SO DISGUSTING HOW DARE YOU DEFILE THE GOOD NAME OF DIP WITH YOUR DEBAUCHERY). One of the things I love about Mexican food is that it gets you to eat more vegetables than you otherwise might: in this meal there was corn, black beans, tomatoes, green chiles, avocados, red pepper, and onion. So underneath all the cheese there's actually some nutrition present. Speaking of nutrition, I couldn't end this post without showing what Amanda made for dessert: 


    Yeah, just kidding, there's nothing nutritious about these. But they sure were tasty and good for my soul. They're a box variety, Duncan Hines...filled cupcakes of some sort? I dunno, but me likey. They tasted like Hostess cakes, but fresher and better. And in case you were wondering, they were nicely frosted, all piped out, but then I said they looked like the smiling poop emoji and when I came back they had been squashed. I didn't mean it as a bad thing. Whatever.

     I hope you all had much delicious eating over the weekend! 


Wednesday, February 26, 2014

I am more guacamole than human now.

     I've been on a guacamole kick lately. A serious one. One that requires me to buy avocados every single time I'm out of the house. But when I went to mix some up to go with dinner last night, I realized we didn't have any chips. Quelle horreur! So I decided it was as good a time as any to try making my own chips from tortillas, which I've wanted to do for a while now anyway. Let's see how it turned out! 


     Pretty edible! All I did was brush some lime juice over corn tortillas, sprinkle them with salt, cut them with a pizza cutter, and throw them into a pan with a bit of vegetable oil and butter. It was kind of tricky to get the frying time right -- it has to land somewhere between not long enough (chewy chips) and too long (burnt). My final verdict though? They were tasty enough in a pinch, but not much better than any corn tortilla chips you could buy in the store, so not really worth the effort in my opinion. Maybe you have to make your own tortillas too for the chips to turn out amazing. I couldn't say, because I don't have the patience for that. 

     Anyway, since we're on the subject, lemme tell you how I make my guac (in case you're curious)! 

     I don't use a recipe because I don't like to measure things. First I chop up some red onion and cilantro (or ask Amanda to do it for me because red onions don't make her cry like they do to me -- I form too much of an emotional attachment I guess), then add a bit of garlic (I use the pre-minced stuff most of the time out of laziness), red pepper flakes, and lime juice (again, mine comes from a bottle. Running theme here: I'm lazy when it comes to my snack foods). The first time I made this I used a jalapeno too, but I hate hate hate handling hot peppers because I can't be trusted to not stick my fingers in my eyes an hour later like an idiot and set them on fire, so I don't bother anymore. The red pepper flakes add enough heat in place of the fresh jalapeno for me since I don't like my guacamole too spicy anyway. 


      Ok, gratuitous ingredient shot (I dunno, I guess I thought I'd include it in case you don't know what cilantro looks like?) aside, then all that's left is to add the avocados and mash it all together. Tangent time: I find scooping avocados out of their skins to be ridiculously therapeutic. Like, I kind of feel like I need to keep a stash of them around so when I'm feeling all rage-y and so anxious I want to peel my face off I can just go scoop some avocados. People would come looking for me and just find me sitting on the floor in the middle of a pile of avocado skins, eating a fistful of avocado out of my hand. Am I alone in this? Nah, I'm sure there's a corner of the internet somewhere devoted to avocado scooping. I'm not gonna google it though. Too scared of what I'd find. Anyway, here's what the guacamole looks like all mashed up and staged in a faux-artsy way with a chip dunked in it, because that's what I'm here for. 


     Ta-da! I realize that guacamole is one of those things that isn't very appealing based on looks alone, so you'll just have to take my word for it that it's good. Trust, it's what's for dinner tonight! 

Monday, February 24, 2014

Recipe Review: Pizza Pasta!

     For this weekend's Sunday dinner, I thought I'd try out this recipe for Crockpot Pizza Pasta. I didn't change much, I just omitted the ground beef so Amanda could eat it (damned picky eaters) and the mushrooms because ew (hi, I'm a hypocrite).  So basically you mix together some uncooked pasta with two jars of pasta sauce and your seasonings in a bowl, then throw that into the Crockpot and top it with some peppers...


     Then pile some cooked Italian sausage, cheese, and pepperoni on top of that...


     Then heat it all up on low for a few hours. Since everything but the pasta's already cooked, you just need to let it go until the pasta is tender and the cheese is melty, which doesn't take long. I didn't remember to take a picture of it when it was all done and gooey and tasty because I'm a ding-dong and I got way too excited about eating to think about taking a picture first, but here's what it looked like all assembled anyway. 


     I'd give this recipe two thumbs up! It was super easy to get ready, was nice and cheesy, and had easy cleanup since I used a Crockpot liner. I think it would definitely be better with the hamburger, and I'd like to try mixing up the extras (I'm thinking ham and pineapple), but the basic recipe is a winner, I'd say. 


Monday, February 3, 2014

Faux-potle!

     For this Super Bowl Sunday, I had a simple vision in mind: build-it-yourself Chipotle food bar. I wanted to track down a bunch of copycat recipes and try them out to see if any of them came close to producing the same magical taste sensation that is Chipotle. Here are the recipes I tried (the titles will be clickable links) and what I thought of them! Also, apologies in advance for the fact that all the pictures are hastily taken cellphone pics. I was gonna send them off to the lab from CSI: Miami so they could be all "Enhance!" and they'd suddenly be HD photos, but they're closed on Sundays, so... 

CHICKEN MARINADE (USED FOR CHICKEN AND PORK)


Verdict: Tasty, and very tender, but not quite like Chipotle. It probably would have helped if I'd actually grilled the chicken instead of cooking it in a pan, but whatever, it's winter. 


Verdict: It's... rice-y? I can't tell you if this tastes like Chipotle rice or not because I've never eaten Chipotle rice by itself, only as part of a massive eight-ingredient food bomb. But it was good?


Verdict: Real talk, I don't order this at Chipotle and I didn't eat it yesterday because I don't really like corn. I only made it because my mom loves it. She said it was good, but something was missing so it didn't taste quite like Chipotle. I think grilling the corn fresh would be a step in the right direction, but that wasn't an option because, again, it's winter, so I used frozen corn. 


Verdict: Spot on. The recipe says to let the flavors marry in the fridge for a few hours, and I made this a day and a half ahead, so the flavors were settled down into a nice single family home with a baby and a dog by the time we ate it. Very tasty. 


Verdict: DING DING DING! Winner! This was deliciousssssssssss. Yes, I just said that in Parseltongue, I got that excited. I doubled this recipe and wished I had quadrupled it so I could just eat a whole bunch of it with chips. I'll definitely be making it again as soon as I can get to the grocery store to buy avocados. 


Wednesday, January 15, 2014

Grandma's Fudge: Whoopsie Edition

     Yesterday I was given a special task from Jen: make my Grandma's fudge. She was having a hankerin' for it, and I thought it would be fun to see if I could do it. 


     See, the problem here is that my Grandma's fudge barely even has what could qualify as a recipe. It's one of those "summa this, summa that" type deals. So because of that, it's not a good recipe for beginners. Although, on the other hand, it kind of is a good recipe for beginners because even if you screw it up, hey, you just made chocolate goo, and maybe that's not what you were shooting for but damn if doesn't taste good. Unless you burn it. God help you if you burn it. But we'll get to that. First let's take a look at the original recipe. 


     Ok, so we've got the basics, anyway. But first! You'll notice it has "milk" listed as an ingredient, but what it should say is evaporated milk, and don't bother measuring it, just get a little can of it. I'm not just making that up, my grandma always used evaporated milk too. I remembered watching her use a little can of milk, but I couldn't remember if it was sweetened condensed milk or evaporated milk. I went with the former and immediately realized it was the wrong choice, but I just added some milk to make a nice thick liquid texture, and it turned out just fine. But I'm getting ahead of myself again! 

     So you take your evaporated milk, your sugar, and your cocoa, and plop 'em into a pan and cook on low to low-medium (is that a thing? Let's pretend it's a thing) until it thickens. If you're like me and you accidentally used sweetened condensed milk, you'll get a weird gritty thick paste, so throw in about 3/4 cup of regular milk and stir it up, and it'll be ok. Now this part is important: stir. Constantly. This is not a recipe that you can throw on the stove and walk away from for a minute. You do have to stir it, literally, constantly. It's not bad though, because you'll only need to cook it for ten to fifteen minutes before it gets thickened to the soft ball stage. My grandma always used the candy-making method of dropping a smidge of the fudge into a cup of cool water and seeing if it turns into a soft ball; when it does, it's just about ready. I prefer to just go by intuition: when you're stirring the fudge and you notice it filling back in on itself following the spatula nice and slowly, like a lava flow. Because I know the hardest part of this recipe is figuring out when it's thickened enough, here's a little gif I threw together so you can see what it ought to look like when it's ready. 


     When it looks like that, it's time to add your power-up ingredients: butter, vanilla, and peanut butter, unless you don't like peanut butter (GET OUT. Just kidding, you can stay while I judge you from afar) or have allergies. The recipe just says "add vanilla and butter." OKAY GRANDMA. Just add it. Some. A lot. Whatever. I used about three tablespoons...ish of butter, a teaspoon or so of vanilla (that's just what was left in the bottle, real talk), and probably close to a cup of peanut butter, because I really like peanut butter, like, a lot. Just add all that in and let it melt in with the pan off the eye, no stirring necessary. Once everything's melted, give it a quick stir to get it all together, then it's pan time! Pour it into a brownie pan and let it chill and set into solid form. Try to resist the urge to lick the spatula and burn your mouth to ashes with boiling chocolate napalm. 

     Once it's set, slice it into bite-sized pieces and enjoy! At the end of all of this, I ended up deciding the sweetened condensed milk debacle was a delicious mistake, because it gave the fudge a sort of caramel-y taste. So it all worked out in the end! 


Friday, January 10, 2014

Yarrrr...lsberg. What?

     I recently discovered a super delicious and easy recipe kind of on accident. Well, I meant to discover it, I just accidentally got it right on the first try when I thought it would be way harder. See, at my Kroger they make this tasty Jarlsberg cheese spread that I tried a sample of once and got hooked on (just as they planned. Damn my susceptible tastebuds!). But it's around five dollars for the ittiest bittiest little container of it, and I just couldn't justify spending that much on fancy cheese products. So I thought I would try to recreate it at home, and it turned out to be amazingly simple, with just three ingredients and some stirring. The three ingredients...


     Jarlsberg cheese (Can anyone else not hear that word without thinking of Skyrim? You should talk to the Jarl, he may have some work for you. No? Ok), real full-fat mayonnaise (trust me, it's important), and an onion. In a perfect world, I'd use red onion, but I didn't have any, and I have the Great Depression mindset of use what you got, so white onion it is. If you're looking at these ingredients and thinking it looks like a Fear Factor challenge or something you'd throw together in desperation the day before you get paid, bear with me. I would not lead you astray. 

     The assembly here is idiotically simple: shred the cheese and dice the onion...


     You'll probably want it chopped more finely than that, but I chopped that far, then threw the knife down and ran off screaming and clutching my eyes like the spitting dinosaur from Jurassic Park had gotten me, so whatever. Good enough. 


     Then add mayonnaise. I wasn't kidding when I said it has to be actual full-fat mayo; I made this the first time with light mayo, and it was good, but not amazing. This is, as I'm sure you could have guessed, the portion of the recipe where people want to know an actual quantity and I say, "I dunno, some?"  because I'm the worst and I cook like everybody's grandma, all "Oh, a bit of this, a smidge of that." About a fistful? I mean an amount the size of your fist, don't actually scoop out a fistful of mayonnaise. Barf. Okay, like, this much maybe?

Least appealing photo. Ever. 
    
     The point is to add enough to hold everything together, but not make one giant mayo-flavored mess. Start with less than you think, because until you really stir it up thoroughly it'll seem more dry than it actually is. Mayo's a tricky bastard like that. 

     When everything's evenly combined, stick it in the fridge overnight. What? I've been duped, I thought this was a thing I got to eat now! I feel so misled! Yeah, ok, I hear you, imaginary complaint-laden reader. You could eat it right away if you really wanted, it's a free country and all, but it'd be a terrible mistake and you'd regret it all your life and when you died and met St. Peter at the pearly gates he'd be like, "Really, bro? Couldn't wait one night on the Jarlsberg spread? You missed out bigtime." Basically if you put it in the fridge overnight, all the flavors meld together and turn into something way more delicious than three unremarkable ingredients have any right to be. It's like having fridge elves who come and do spells over your food. 

     When you're finally ready to eat it, here's how to do it: on a Townhouse cracker. That is the one true path to deliciousness.

Thanks for reading, have an aggressively close-up shot of food!

     I know it doesn't seem like it, but this is so gooood. I hope you'll give it a shot sometime! 


Friday, January 3, 2014

Amanda's Favorite Cookies

     This post is exactly what it claims to be: the recipe for Amanda's favorite cookies. I don't make them that often because I prefer drop cookies to cutout cookies, but sometimes she gets to pestering me about it and won't stop until I make them. So I figured I'd share them with you! They're kind of a strange cookie: chocolatey through and through, but very light and flaky in texture, almost closer to a pastry than a cookie. 


     The original recipe is out of a book my friend Elise gave me once (it's this one right here, if you're curious). They're called "pressed chocolate cookies" in the book, but I always call them chocolate envelopes, because that's more descriptive. Read on and I'll show you how I make them! 

     First up, gather your ingredients. 


     You'll need:

     1 1/3 cups flour

     2 tablespoons cocoa powder
     2/3 cup softened butter
     3/4 cup sugar
     1 egg yolk
     chocolate discs, chunks, or whatever else you want to cram inside the cookies

     First up, preheat the oven to 375 degrees, and grease a baking sheet with butter or cooking spray. Then mix the flour and cocoa together in a medium bowl. In another bowl, a large one this time, beat together the sugar and butter, then add in the egg yolk and beat some more. When it's all combined, add the dry ingredients from the medium bowl to the large bowl and beat until everything is nicely mixed up. The dough will look really crumbly. Like this!  


     Now, the original recipe says to refrigerate for at least 30 minutes, but I think they put that in there just to screw with everybody. Don't do that. This dough is so crumbly and dry that if you chill it, it will never, ever roll out without cracking apart. You have to do the opposite and warm it up a bit by kneading it and squishing it with your hands until it starts to hold together. Once it holds its shape, throw down some flour and start rolling it out. It's very important to also flour your rolling pin, because the dough can start to pull up and tear if you're not very gentle with it. It's kind of a pain in the tush, but suffering makes the cookies taste better. Once the dough is rolled out pretty thin (1/8 of an inch if you can get it there, thicker if you get tired of rolling and decide where it's at is good enough), cut a whole bunch of circles out with the cookie cutter/glass of your choice. I use a little biscuit cutter. 

See how the dough stuck to the counter a little in the missing cookie's spot? Flour, flour, flour your surfaces, friends. Don't be like me! 

     Once they're all cut out, it's assembly time! Just place your chocolate disc (or whatever else you're using) in the center, put another cut-out on top, then press the edges together with a fork to seal them. 


     Plop 'em on the prepared baking sheet and bake them for about 8 minutes. I always start with 7 and then keep a close eye on them, because I like my cookies to essentially just be heated-up dough, but if you like a crisper cookie, let them go a little longer. When they've spread out just a bit and the edges start to set, take them out and let them cool on a wire rack. They'll still seem a little underdone when you first take them out, but they'll continue to set juuuuust enough while they cool, which is what makes their divinely odd gooey-but-kind-of-crispy texture. 

     Then they're done! Enjoy them while you can, because a batch only makes about a dozen, so they go fast. 


Monday, September 30, 2013

APPLEEEEESSSSSSSSSS

     I went apple-picking Sunday. 


     It was the perfect day for it: sunny and clear and cool and breezy and generally delightful. We got approximately one camels-weight of apples (that's a measurement, right?) and some apple cider donuts, and I had myself a cider slushie. Mmmmm. The apples are, of course, delicious, but we now have...a LOT of them. Like, a lot a lot. 


     As in, I had trouble cooking dinner because every horizontal workspace is covered in APPLES. I'm not complaining though. I'm like the Bubba of apples. Apple pie, apple salad, apple cake, apple cider, caramel apples, apple pancakes, grilled cheese and apple sammiches, apple-topped pork....apple isn't a word to me anymore. I've lost it. 

     Suffice it to say I'm about to be eating a lot of apples.

Monday, September 23, 2013

Cooking Basics: The Easiest, Most Delicous Roast Ever. Yeah, EVER.

     There are days when you want to assemble some sort of lavish casserole structure for dinner that takes five pans and a good allotment of time for construction. Then there are days when you want to put a bunch of stuff in a slow cooker and go about your life (or go back to bed) and forget about it until you walk into the kitchen and smell it and think "Oh, yes, my house elf has done well preparing dinner tonight!" Except not really, because a) if you have house elves you are an abomination of a human being and b) they're technically not real. And I guess c) you actually did the work yourself a few hours ahead of time. Anyway, for those days when you don't wanna do any real work, this is one of my favorite slow cooker recipes. 


     The beauty of this recipe is it's simplicity, because if you don't add anything to it, it's just a classic Sunday beef roast type deal, and it's homey and comforting and delicious. But if you feel adventurous, you can build on it however you want. It's one of the recipes I think of when people insist to me, "I can't coooook" and I tell them to shut their lie-faces up, because some things literally anyone can cook. The secret of its deliciousness is the three basic ingredients that you HAVE to do how I say (I mean, not really. But I'm as good an authority on this as any. You don't even know Alton Brown, are you sure you want him telling you how to cook your food?). Everything else you can screw around with. The basic ingredients:

1. Beef
     Another great thing about this meal is you don't have to buy expensive meat. Any chunk of beef will turn out just fine if you cook it long enough to make it tender, so don't waste your money on the nicest cut you can find, now is not the time to be a meat-elitist. The only real guideline I have for you here is make sure it'll fit in your slow cooker, which I kind of feel like I shouldn't need to tell you, but I did call this post Cooking BASICS, so...you know. Do that. 


2. Beef broth 
     "But why do I need beef broth if I'm cooking beef?" Because cooking is just a modern, de-stigmatized form of witchcraft, and you don't see witches being like "Oh, but I already have newt in this potion, why would I add eye of newt too?" do you? Trust. It's important. It makes magic happen. The guideline for amount here is essentially, "some." You'll want enough to at least halfway cover your roast, generally, but err on the side of adding too much. Too much and you'll just have to kind of fish your meat and potatoes out, which is no big deal, but too little and it'll be too dry and you'll RUIN EVERYTHING, no pressure. Just add some broth. 

3. Potatoes
     Baby yellow potatoes are the best for this, because the beef broth softens them perfectly and makes them so buttery rich and delicious that you will take a bite and actually sigh and think about how lucky you are to be a human being with access to a Crockpot instead of like, a beaver stuck eating tree bark. That said, if you insist on messing with perfection (or you just want to try something new) you can use red potatoes. I maintain that baby is the only acceptable age group of potato for this, though, because they cook up soft all the way through and you don't have to chop them at all. 

     This is the Triforce of Deliciousness. If you throw just these three ingredients into a slow cooker and let them do their thing for six hours, you'll get delicious dinner every time. But here's some ideas for things you might want to consider adding: 

     --Veggies: Onions (Vidalia or any kind of sweet onion is particularly yummy), Carrots, diced Tomatoes, Peas... any of your typical stew vegetables will cook up well here.

     --Seasonings: Spices and flavor add-ons are a good way to make any food taste like you worked harder on it than you did. For this recipe, you can take it into a spicier territory with some chili powder or red pepper flakes, go for a barbecue-like spin with brown sugar and a splash of vinegar (for tangyness, and it also helps tenderize the meat if you bought a tough-ish cut), or go upscale and add some red wine. 

     --Miscellania: If you want to easily take this from a roast to more of a stew, add the vegetables of your choosing at the beginning and a bit of flour towards the end of the cooktime, then when you're ready to eat, take the roast out and shred or cut it, then throw it right back in. Egg noodles are also delicious; again, just throw them in a bit before you're ready to eat (pro tip: if you're adding noodles, drop a dollop of sour cream in, too for bonus tastiness). Just keep in mind that if you're adding any dry ingredients like noodles (or rice, even!), you'll need to use more beef broth to account for that. 

     There you have the basics for this recipe, oh ye who swear ye cannot cook. Seriously anyone can make a good beef roast, regardless of cooking experience, so I'll hear no excuses on this one. Go forth and make savoriness!


Wednesday, August 28, 2013

Pasta Invention Time!

     By now you know I love to cook from any number of delicious-sounding/looking recipes I find, but I also like to occasionally dabble in Iron Chef-ing, aka grabbing a bunch of ingredients and seeing what I can come up with. Today's recipe comes from just that (also, due to the spontaneity of it, the pictures for this post are kind of lacking in quality. Yep, cell phone pics. Sorry!). I had picked up these noodles at Target with no particular plan in mind; I just spotted them and thought "Oh yes. I want to eat those." So let's see what I came up with for them! 


     First thing's first: I boiled the noodles. Seems obvious, but hey, I don't want to be the one that accidentally convinces you to eat uncooked noodles. Then I started cooking up some bacon.

 
     I had originally thought I'd just use the bacon grease to get a bacon-y roux going (fun fact: basically any recipe that starts with a roux is gonna be delicious) and use the bacon in some other recipe, but then I ate a nice crispy piece and thought "Wait a minute, idiot, bacon is delicious. Put it in the pasta!" So I chopped it up and set it aside. Back to the sauce! 

     As I mentioned, I wanted to go with a roux here. If you're not familiar, basically a roux is just a mix of fat and flour that gets you a nice thick base for sauces. It's usually made with butter, but this is America and I had bacon. So I whisked some flour into the bacon grease until it...looked like it does in the picture. Look, I'll be honest: this is one of those things that you learn from trial and error. There is no set amount of flour or anything, you just add some until it looks good. Same with the milk I added next. I just poured a bunch in while stirring until it looked about right. So that's the downside: some cooking things you just have to screw up a few times to learn how to do them. The bright side is that once you learn how to cook things that have no real recipe, people who don't know how to cook will watch you do it and look at you like a god. So that's fun. Anyway, once the sauce was looking smooth I threw in a big ol' pile of grated Asiago cheese and let it melt.


     Then I poured the sauce over the noodles and added most of the chopped bacon. I also stirred in a little dried ground mustard (trust me, it adds just a leeeetle kick to cheesy dishes) and some red pepper flakes for a dash of heat. Now, I could have stopped there, but you know what they say: if it's worth doing, it's worth doing in a manner so decadent and amazing you almost feel a little ashamed to admit to the internet that you did it (that's how that saying goes, right?). So I spread the gooey deliciousness out in a casserole pan...


     ...and whipped up a topping of, what else? MORE CHEESE. I used some mozzarella, some cheddar, and some Parmesan (what's that bring our cheese count up to? Four?). Then I toasted up three slices of bread and crushed them to smithereens for some fine bread crumbs (fine as in texture, I meant, but I guess fine as in fiiiiine could also apply, depending on how into bread crumbs you are) and added that to the mix. 


     Then I just sprinkled that mixture over the top of the noodles (along with the bacon I didn't stir right into the noodles) and popped them into the oven for a few minutes to get a melty, crispy, amazing crust on the top.


     Awww yiss. This is happiness in a pan. Obviously it's not diet food, but if you came here expecting that then I don't even know what kind of wrong internet turn you took, but you're in the wrong part of town, buddy. You don't belong here. Go back and take a right turn at Google Street over to Pinterest Lane, you might find some health food there.