Showing posts with label DIY. Show all posts

Thursday, September 17, 2015

Home sweet apartment!

As promised, please allow me to show you around my new place! Well. Parts of it. Obviously I'm not gonna show you like...the bathrooms, or the guest room/office, which is currently a cat shantytown (by which I mean it's full of half-empty boxes). But parts of it look pretty legit! Almost like actual functional grown-ups live here! Let's look, and I shall regale you with tales along the way. Also a quick disclaimer: these are all cellphone pictures, because I didn't think to pack my camera. Worst. Blogger. Ever. 


Living room! So, this was the hardest to pull together. We started out with no living room furniture at all, so we had to shop around for a couch, coffee table, and entertainment center thingy, then wait for it all to get delivered. We ended up getting everything from Rooms to Go. The entertainment center came first because it was a floor model, so it came from the store rather than having to come from a warehouse. You'd think that would mean it was faster and easier to get, and you'd be right if they hadn't first brought us the wrong one. It worked out eventually though, so I won't complain too much. 


I'm obviously really fond of all the furniture we got (or else I wouldn't have picked it),  but the entertainment center is probably my favorite part. I just think it's super interesting and stylish, plus it's nice solid wood, so it'll last for ages. And since it was the floor model, it was an attractively discounted price. The bookcase is just a simple Room Essentials brand one from Target (there's another one just like it, but shorter, in the bedroom). The small table by the door (from Ikea several years back) is just temporary--at some point I'd like to replace it with something more decorative, maybe a little art deco number of some sort. For now it's a good place to keep sunglasses and things that get misplaced on the way in or out the door, like wallets and phones.


The chairs are, again, and surprising no one that is at all familiar with my Target addiction, from Target. They're lightly padded and are actually surprisingly comfortable, especially considering how affordable they were. If you're wondering why the table from by the front door is over there hiding behind the table, it's because the day I took this was the day our couch was being delivered, so I scooched it out of the way. That table, by the by, is actually a source of great pride. It cost us a whopping fifteen dollars. Yeah, I said it. FIFTEEN DOLLARS. Of course, it started out life looking like this:


I mean, it was assembled. I'm just not great at forethought and didn't think to take a picture of its starting point until I'd already gotten it disassembled to get it home from Goodwill. You can see it started out with some uninspiring laminate on the tabletop and plain wooden legs (feet? I feel like the legs are actually the brass part, which would logically make the wood parts the feet, but...then aren't the little balancer thingies also called feet? Or are those toes? Someone help me, table anatomy is not my strongsuit). But I really liked the unusual silhouette, and I had a vision for what it could be. A bit of sanding, some primer, and two coats of shiny black lacquer later, and it's a sassy little beast. 


Speaking of sassy beasts: bonus cat picture! It kind of vaguely shows off our lovely wooded view (we got an apartment on the back of the building, so our balcony is relatively private and quiet), so it's sort of on topic. Mostly I just like to give the people what they want, and what the people want is cat pictures. I assume. 


Here's the rest of the kitchen. The island is movable, but it's really useful where it is, providing valuable prep space, so it's most likely going to continue living there. The walls by the table desperately need some sort of art or shelves or SOMETHING, anything to make them less bare, but as you can imagine, decorating the walls is lower on the priority list. So for now, let's just pretend it's a minimalist statement.  


And of course, the most important part of any domicile: a nice comfy bed. One of the things I was most excited for about this apartment was the fact that the rooms are surprisingly huge: big enough for this king sized monster. I know the picture doesn't show much detail, but the bed frame is from Ikea and has four gimongous drawers underneath for bonus storage. Our closet is respectably sized, but we also have a lot of stuff, so extra storage is always welcome. The mattress was a gamble, since I bought it online without having tested it out at all. The reason I made this leap of faith? It was only around $300. For a king size, 8 inch memory foam mattress. With free shipping, even! That's a steal. I got it through Sears, whose return policy on mattresses gives you 60 days to return or exchange if it turns out to be hideously uncomfortable. Luckily it's a damn DREAM to sleep on, so we didn't have to worry about that. The duvet is a linen/cotton blend set from Target that I got on clearance for half off, and the sheets are the Pure Beech Jersey set in black, which I got from Bed Bath and Beyond and used a 20% off coupon on. I tell you this because I am a long-time evangelical when it comes to these sheets. They're well under a hundred dollars, even in king size, come in some fun colors, and are easily the softest sheets I've ever touched. I've had several sets over the years, and I recommend them every chance I get. Seriously, go feel the sample at BB&B if you're in the market for sheets.

And now, after detailing the glory that is that bed....I think I'll go crawl into it for the night. 


Monday, July 21, 2014

Bring me all the stuff and junk and doodads you can find.

     I made a thing this weekend! And by "I made," I mean "I had the idea and bought parts for, then asked my dad to help me with anything that could end in me drilling off part of my fingers." Technicality. Anyway! 

     So Ollie and Evie are at an age where they've gotten really into....everything. Ollie in particular is fascinated with doorknobs and drawer pulls, and Evie likes to just stare at various mechanisms with her hands up by her shoulders, twisting them around in circles in the air while she thinks about what to do next (I feel you, girl. Me too). So I figured one of these "busy board" type deals would probably be life-alteringly delightful for them. Or at least they'd enjoy smacking things around on it for a few minutes. Either way, worthwhile pursuit. 

     If you're not familiar with the concept, a busy board is basically just a hunk of wood that you slap a bunch of....things to mess with onto. I picked up two kinds of door locks, a drawer pull, a twisty ring drawer handle doojig (world's tiniest doorknocker?), and a bunch of large washers, then went rootin' around in the garage and came up with a hinge, two wooden handles, and that little...thingzer at the bottom right. Can you tell I'm basically useless in a hardware store unless I'm buying paint? I kick ass at picking out paint. Beyond that, I cannot help you. Once I had all that gathered together, it was basically a matter of sticking it onto something. My dad sanded a spare piece of wood down nice and smooth and took off the eye-poking threats at the corners, then helped me attach everything securely so there's no risk of any choking hazards coming loose. And here's where we ended up! 


     In case you're curious, here's a labeled guide so you can learn something today. 


     Just kidding, told you I was useless. 


Wednesday, July 2, 2014

Quick Fixes: T-shirt Envy

     Here's a scenario I find myself in frequently: you see a t-shirt somewhere online and think "Oooh, I want that!" then you either a) can't find it again later or b) track down where it comes from and find out it doesn't come in the size/color/material/exact font that you want. What do you do? Make your own! 

     This time around I kept seeing variations of the same idea: some shirt (long sleeve, short sleeve, white, pink, blue, what have you) with the phrase "ex-mermaid" on it in any number of fonts. This pleased me. I frequently joke that I used to be a mermaid, since that would explain the truly stupid amount of hair I have as well as my insane water consumption needs (I wake up like Spongebob in Sandy's treedome. waaaater. waaaater. Also one time in Target I picked up a bottle of water at the checkout, but the line was somewhat longish and by the time I got to the cashier I had to buy a second bottle because I'd already drank the first one. The struggle is real). And my uncanny ability to lure sailors to their deaths and collect their souls, I guess (I would not be a sweet mermaid). Anyway, I decided I'd just whip myself up a version of that theme.


     For the stencil, I downloaded a free font I liked, typed it up, then printed it and asked my mom to trace/cut it out of stencil material because I can't be trusted to not cut a finger off with an x-acto knife (I'm too shaky; like a chihuahua but more rattled). Then I just taped the corners down...

This neon paint and nail polish color actually make me look tan. What a fantastic illusion. 

     And stippled the paint straight up and down over the stencil. If you go at an angle at all you can end up getting paint under the stencil, so it's important to hold the stencil tight and your pouncer thingy straight. Then let the paint dry a bit, pull off the stencil and...


     Voila! The dark splotch up there is because I tried to ruin everything by getting a smidge of paint off the edge of the stencil. I caught it pretty quickly though, so it came out with a wet paper towel no problem. I think I'm going to roll the sleeves on the shirt (it's just a plain pale pink short sleeved oversized tee I picked up at a craft store out of a sale section. It doesn't look very pink here, but as we've seen, the neon plays tricks) and tack them so they stay up, then it'll be ready to wear!


Monday, June 23, 2014

Well it's no "forever comfy," but it's a damn sight prettier than that too.

     Have you seen the infomercials for the Forever Comfy? It's pretty convincing. It will make your butt comfy forever. For all eternity. In this lifetime and the next, you shall have the comfiest bum. I want it kind of badly, but also not at all because I'm not an arthritic 80 year old postman who needs to shore up his La-z-boy's defenses before plopping down to watch golf and eat a microwaveable Salisbury Steak. So. 

     Anyway, I needed a new cushion for my desk chair, because the one I had was not squashy enough to suit my needs, and it was also bought as a placeholder while I looked for something better, but it did that sneaky thing where it hung around for like eight months without me noticing. Originally I wanted to buy a new chair entirely, because the one I use is actually a decades-old kitchen chair that is badly warped and incredibly uncomfortable, but it turns out chairs are expensive and I am le poor. So the next best thing was to get a new cushion, and when I couldn't find one that was the right dimensions and suitably cute, I realized it was time to engage the craftiness ray. I picked up a cushion filler thing-jig and a nice geometric print duck cloth that matches the accent colors in my room (like the dark blue throw pillow on my bed and the various blue tones on the back of my desk), as well as a zipper so the cover could be removable for washing purposes (important because I sit at my desk and do my makeup, and apparently I put makeup on like a toddler, so it gets everywhere). And then...


     Cue the record scratch sound, because I couldn't actually find the motivation to stitch it up. I go through phases with my DIY-ing, where for a while all I want to do is craft this, sew that, make this, but then for a long time I might not want to make anything (except food. I always want to make food). Or sometimes I wake up with a weird urge to clean, and all I'll do is clean for three days. I dunno, it's a weird process. 

     But whilst I was out the other day my mom decided she felt like sewing, so she made it for me to surprise me when I got home! She's the best. And she even took all the pictures in this post so I could blog about it. Did I mention she's the best? So! Here's how she whipped it up. 


     After cutting two pieces of fabric that were two inches bigger on all sides than the foam, she folded the edges over half an inch on one end of each piece of fabric, ironed them down, then laid the zipper on top of the folds and sewed it in. 

"Put a picture of the zipper in, that's the most impressive part!" she says. I know this picture is from later on, but we're talking about zippers now, so whatever.


Then she opened the zipper and sewed a half inch seam on the remaining three sides.


     For the corners, she opened up the seams and lined them up. The cushion was three inches thick, so she measured three inches edge to edge as pictured, then sewed across that line. Then when it's turned right-side-out, it looks like this! 


     And that's it! I came home and found my chair looking all snazzy like this.


     And the best part is it makes that chair of angles and sorrow a thousand times comfier. 

Wednesday, June 18, 2014

"Do one eye at a time, in case you go blind." "Yeah, I could rock a bejeweled eyepatch."

     I endeavored on a kind of stupid pursuit a few days ago: eyelash tinting. You're never ever ever supposed to do it because allegedly you can go blind, but after doing a little reading my conclusion (just mine! Don't ever follow my example, it will only lead you to sorrow) was that it's one of those things where it may have happened once or twice a long time ago but it probably won't happen now, the FDA just has to warn you because they don't want you chemically burning your eyeballs out thinking they said it was ok. So anyway, I did it. I did a bunch of research and picked the brand that I felt was safest (something called Refectocil, in case you're wondering -- I also used their brand of oxidant, just to make things easy). It was pretty easy; I decided to slap some tape on the back of my hand a few times to take the stickiness down, then put it under my eyes to prevent too much staining, then just mixed up the dye and brushed it on with the brush from the kit. I was pretty careful not to get it in my eyes (I wore contacts for like ten years before I got my eyeballs lasered, so I'm pretty good about not flinching or twitching my eyes too much, so I only felt the tiniest bit of stinging when a bit of the dye got in. I kept some saline ready just in case I experienced any horrific searing pain and decided to abort the mission before the ten minute setting time was up, but I didn't end up needing it. And I'm not blind! But enough about that, let's talk about the before and after.

After lashes are just dyed, no mascara or anything at all. And so shiiiiny. 

     You might be able to tell in the after picture that there are a few stubborn eyelashes that just really wanted to stay white, but I ain't even mad. That's a damn fine improvement, I think. I'm super pleased with it because having just that little bit of extra definition means I feel like I don't have to wear mascara every day since my lashes are naturally so blonde they're kind of invisible from a distance without mascara, which is...odd looking, to say the least, on me. I have recently developed a visceral hatred for mascara. I mean, I still love what it does. It's so strangely satisfying to put on a good mascara and then feel like you could shoo a butterfly away with your lashes. But I despise taking it off at night. It's just too messy, and I have never been able to find a good remover that doesn't get it all over my face or sting my eyes or irritate my sensitive baby princess skin or break my lashes or make my eyesight all bleary. So being able to wash my face without temporarily looking like a large raccoon has been a delight, not to mention that it's nice to wake up feeling just a little bit prettier without having to do anything daily.

     So I'm not going to tell anybody "Oh yeah it's totally fine, do it!" but I'll just say "Eh, it didn't turn my eyeballs into jam" and shrug noncommittally. And probably bat my shiny dark eyelashes.


Monday, June 16, 2014

Melted Popsicle Hair,Take 2.

     Time for more of Amanda's hair adventures! This time she just used a boxed bleach first, which was by Feria and called...I don't remember what it was actually called in English, but if "Super Platino" is any indication I'd guess Super Platinum was the name. I remember Super Platino because that sounds like an amazing superhero. This one actually got her hair way lighter, and once the blue was on there....well, see for yourself! 


     Oooh, so shine, much mermaid. The annoying part is she keeps saying "oh my ends are sooo dry, they feel horrible" and then I touch it and it's softer than my hair has ever been in its life. The nerve. 


Monday, June 9, 2014

Melted Popsicle Project: Part I

     So the time has come once again: the time when Amanda wants to do something different with her hair. This time she started off with slightly faded dyed black hair and was shooting for something like this; a sort of ombre fade into turquoise. Here's the before.


     And here's all the supplies she picked up at Sally's, in case you're interested in such things.

 
The Wella Colorcharm is for toning the hair once it's been bleached nice and pale to give you a good non-orangey starting point. She didn't use it this go-round because her hair only lifted about three levels and she was fine with a more green-y blue anyway. 
     I warned her that because her hair was starting off so dark there was pretty much no way she was going to get it light enough to be as vibrant as her inspiration picture in one go. So she just bleached the tips until they were light enough to at least take some color, then put the blue overtop, reasoning that once it fades (and her hair has had some time to recover; obviously avoiding damage is always a priority) she can do another round of bleach to take it lighter, then add blue on top again. So! Now that we've got all that out of the way, here's an after for you!


     As the title gives away, I hope to bring you an update as it progresses so you can see how this hair experiment turns out. Right now it's pretty subtle except in sunlight. But hopefully we can get it to her goal: looking like a melted blue popsicle (hey, follow your dreams everybody).


Friday, April 18, 2014

Quick and Easy Maxi-skirt!

     This little project was born of necessity. Basically I was wearing the two other maxi skirts I own every day (well, every day it was warm enough) and realized I could use a more neutral one so I would never have to wear pants ever ever again so long as I shall live (until fall). So I picked up that gold polka-dotted stretchy number you saw in that preview post, and a bit of elastic here and some stitching there, then I had a skirt! Ok, it was a little more than that. But not really. Basically here's what happened.


     Only one seam, since I wanted it to be gathered anyway (so you wouldn't see it) and "there's no point cutting it just to sew it back together" as a front and back panel, as my mom said. So wise. Elastic at the top, sewn on with the elastic streeeetched out, so it gathers when in its natural position, with one row of zig-zag stitches to hold it to the back of the fabric, folded over, and another row of stitches to hide it. Hem at the bottom -- honesty time, I haven't done it yet, which is why in the "finished" picture I'm about to show you I'm on my tippy toppy toes -- and that's about it. 


     So now I just need to hem this bad boy, then I shall commence wearing it every day until people start to make fun of me for it, at which point I will... continue to wear it but know in my heart of hearts that those people kind of suck a little bit. 


Monday, April 14, 2014

Sneaky peek-y!

     Over the weekend I was really very sick. For reference, I'm generally one of those stubborn idiots who won't go to the doctor until I'm knocking on Death's door at 3AM yelling "Come outside, Mr. Deathy, unless you're scaaaared," and at one point I was so dehydrated I was genuinely concerned I might need to go to the hospital. Couldn't keep any water down. Stomach bugs, man. They are my downfall (Well, I have many downfalls. I am a delicate flower). I'm feeling somewhat better since my dad ran out and got me every flavor of Gatorade so I could force in some electrolytes and junk, and my mom made me a grilled cheese when I was capable of eating again. That's the great thing about parents, man, they just refuse to let you die. Anyway, the point of that was to preface why today I've just got a little preview of some upcoming projects.  


     Any ideas what I'm making with these things? Don't worry, I'm not going to leave you in suspense. The sheer fabric with the cool little flower embroideries is going to be a kimono(?!)/sheer jacket/thing like the one from Target that I recently put in my favorites. Yep, just loved it so much I decided to pull a Thor (I like this. ANOTHER!). The black pom-pom trim is going on the sleeves, just like the Target one -- partly because I guess I ran out of creativity there, partly because I thought it would be a good way to keep it from looking too funereal/lingerie-like. As for that stretchy black fabric with gold polka dots, it's going to be a maxi-skirt. I have a blue one that I made from an old dress (I can't remember if I blogged about it or not, and I'm too mummy-brained to go look for it) that I wear constantly, so I thought it would be pretty easy to make another one. It's just an elasticized fabric tube, after all. Do those sound like last words, courting danger, asking for it to be really difficult for some reason? I kind of feel like yes, but I'm feeling reckless, let's leave it. 


Wednesday, March 26, 2014

Quick Fixes: Looket this locket!

     So I was browsin' the craft store the other day, helping Amanda pick out ingredients to make a necklace for an '80s party, when these little thingies caught my eye.

They were also on sale for 50% off, so if you were thinking that $8.99 is surprisingly pricey for a cheap-ass like me, you were right! 

     Actually I first saw the little filler doodads on the left there and did a "gasp OOOOOOOOOH" because that is everything I love in my jewels contained in one tiny package: moons, stars, mixed metals, sparkles (they had a TON of different sets too: beach theme, sports, and so on). Then I spent a good three minutes trying to find the other component, the thing you actually put the baublies in. I finally found them at the veeery top of the display. They had this plainer version and one that had rhinestones around the outside, like in the picture on the packaging on the left, but I thought that was too flashy for me. 

     So I got them home and put them together (it just snaps open with a strong magnetic closure, like a locket), and IT'S REALLY PRETTY. Sorry for getting all capsy, but I really like how it's got a thrown-together vibe, like "Oh I was just finishing up some spells I was casting this morning and tossed some talismans and charms in here to take with me," because you know one of my favorite aesthetics is "weird cat-lady who the neighbor kids are pretty sure is a witch," aka the aunts from Practical Magic. 


     I'm going to put it on a long silver chain to wear, but I can't decide if I should leave it as is or age the silver locket part a bit. It might feel a little too shiny and new for me right now. I was thinking of scuffing it up a bit with some sandpaper and rubbing a little dark paint in the scratches to make it look old, like someone recently dug it up in the forest (I have weird fashion aspirations, don't I?). Or possibly putting some tiny bits of gold or copper leaf on it in a few places to bring in more of that mixed metal look I love so much? I'm not sure how that would hold up, anyway. I just don't know! I'll have to think on it. 


Monday, March 24, 2014

Gold on the Ceiling...Ok, tin but whatever.

     Check. Out. What my dad put up in the kitchen this weekend. 


     This epicness is the new tin ceiling. It's super fancy and historical looking and makes me feel like I should pop on a monocle and drink tea from fancy china with my pinkie out. It only took a day and a half-ish to install, probably because my pops is superhuman and never runs out of energy, so he just works and works and works until everything's done. I did not inherit that trait. I'll work until I feel like I've made a good amount of progress, then spend ten minutes googling videos of goats jumping or whatever before I feel refreshed enough to start up again. I have methods, don't judge. Anyway, we're all basically colonial-president-level fancy around here these days.


     The tiles are from American Tin Ceilings, and they were pretty pricey, but it's something my mom has wanted for a long time, ever since seeing all the gorgeous old tin ceilings in Downtown Fredericksburg. Plus you just send them the measurements of your room and they draw out all the plans for you, so that's nice. There's lots of other really beautiful options, too (go here if you fancy a looky-loo). These are the 24 inch tiles, so they're not too small and busy or anything like that (although I think small tiles could be cool in the right room, or even as a backsplash). 

     So next time you're thinking "Hey, I need my house to look at least 30% more like a set from Downton Abbey," maybe a tin ceiling is the answer! 


Wednesday, March 12, 2014

From fail to...slight less...fail-y....I dunno, these puns don't write themselves, you guys.

     So remember when I re-did that lap desk? Yeah that turned out to be a total failure. It sucked the first time around anyway because of that whole thing where I had forgotten why I freaking hate Mod Podge so much, but even after I finally thought I had it done with spray adhesive and clear lacquer, it ended up not working out. 

Booo, hissss.
     As I had feared, the paper pulled up on the edges and got torn up. Luckily I had a backup plan. See, it had occurred to me about an hour after I finished, as ideas tend to do, that if I was going to go with white and gold stripes, why didn't I just paint the damn thing in the first place? But at that point it was too late. 

     Which brings us to me tearing off that paper in big, satisfying chunks. I thought it would be miserable to scrape it all off, but it was actually alarmingly easy. But once it was all gone, there was this...


     The spray adhesive had left a sticky lumpy mess behind that I couldn't just paint over, so I took some sandpaper to it. Once that was done, I took some white spray paint to it...


     ...which was HORRIBLE AND PATCHY AND MADE ME FEEL SCREECHY AND THE SCREECHING ALARMED THE DOGS. I seriously had a rage meltdown at this stupid spray paint. It sucked so bad. I kept doing nice thin coast like good spraypainters are supposed to, and it just...never got any better. Once I'd done a truly stupid number of coats and it dried it didn't look quite as terrible, but I still glowered at it for a while before deciding if I even wanted to keep going. I was at a point where I'd put so much work into this stupid lap desk and it still looked like crap, so I kind of felt like I should just trash it and go buy a new one somewhere. But I persevered! Mostly because if I hadn't I wouldn't have had anything to post about today. Except maybe "I tried to do a project but it sucked because I suck at everything DESPAAAAIR" and I feel like I do those posts pretty often as it is, so. Anyway.

     After I gave it a good long while to dry, I taped off some stripes with Frog tape, since that's supposed to be le so much better than regular painter's tape. I just eyeballed them, because that's how I roll. 


     Then I went to town with my gold spray paint and pulled the tape off as soon as I was finished. Well, technically I waited long enough for me to fumble around for the tape packaging and read through all the "don't eat this, you'll die" warnings to get to the directions and find out if I was supposed to wait or not. Then I pulled it off. It felt like an accomplishment that I didn't have any color bleed underneath. 


     The stripes ended up covering most of the lingering patchy weirdness, and once I coated it with clear lacquer and brought it into its habitat it didn't look messed up at all (high praise). 


     So I guess I'm...satisfied with it? It works, it looks nicer than its previous incarnations, and it shouldn't peel up or chip or anything strange like that, and at this point I'll take that as a win. I know, I know, I'm almost too inspirational: "DIY! Take a drab thing and turn it into something that you don't entirely despise!" 


Friday, February 28, 2014

Quick Fixes: Alternate Ending Edition?

     One of the perils of working from home is that it's hard to designate a work space, so if you're anything like me you end up working in bed all day. Supposedly that's bad because then your brain associates climbing into bed with working instead of sleeping, so it's harder to sleep at night or whatever (the human brain is an amazing piece of machinery. And also really stupid). Plus I feel like if you sit on memory foam all day your ass'll turn to straight-up mush. I can't work at my desk because the chair is really uncomfortable and the height of it would make my head snap off my neck after a few hours of working (I hunch. I hunch bad). So I've been trying to get into the habit of using my super-comfy glider and a lap desk. That way it's comfy, I don't slouch over what I'm doing, and I can set everything aside to get up and walk around every now and again (so my butt doesn't turn to Play-Doh. The concern is real). The only problem? After staring at that lap desk for hours every day I started to resent it for its ugliness. I don't know why; it's not like it had, like, a repeating print of the poop emoji all over it. I just got really tired of looking at its fake wood-grain top. I make no claims that this is rational. It is but my truth. 

Ugh, look at it. It's like...smug. 
       My weird projections about the bad attitude of a slab of compressed sawdust aside, it also had some nail polish and ink stains on it that weren't exactly gorgeous. So a plan was hatched! First let's see how it turned out. 

Ta-daaaaa! If this picture looks hastily taken, it's because my camera kept saying "battery exhausted" and turning off before I could take an after picture and I was like "okwhateverfine camera, WE'RE ALL EXHAUSTED BUT WE STILL DO OUR JOBS." 
     So to get to this I took a roll of wrapping paper, cut a manageable approximation of the right size, then hit the lap desk with some spray glue and carefully rolled the paper across it, trying to keep it from getting any bubbles underneath. Then when it was all smooth I flipped it over and traced around it with an x-acto knife and did two coats of clear lacquer to seal it, so if I spill Diet Coke on it or something it'll wipe right off.


     Now if I made that seem like it was all sunshine and daisies and the magical crafting gods smiled down upon me and said "let thine endeavors go smoothly on this day," that is because I am a tricksty hobbits who trickstily arranged her blog post to make her look like less of a failure. But then thought "whatever, everyone already knows I'm a failure" and decided to include the rest of the story too. 

     What actually happened was that when I bought the wrapping paper I thought "Oh I'll just mod-podge this onto the top and it'll be all glossy and decoupaged and cool!" And so I did a nice thin even layer of mod-podge, then carefully rolled my paper across, squeegeeing out any air bubbles as I went...only to have it turn wrinklier than the littlest piggy at the market after a long bath when it dried. At this point I stared at it, seething and remembering the last time I used mod-podge, which also ended with me saying "Why do people even use this? It suuuuucks!" Seriously, I am hard-pressed to remember a mod-podge project that didn't end in total unmitigated disaster. So it looked like crap, and it was too late to just pull it off and try again, so I spent twenty minutes scraping it off with a...spackler? What is this thing even called?


     So that was fun. And by fun I mean I sandpapered off my fingerprints trying to get the last bits off. 

     But all's well that ends well, and it looks nice now. And I learned an important lesson: Never to try a mod-podge project again as long as I live. Yay, learning! 


Monday, February 10, 2014

No thank you, I don't have a house. I'm just here to looky-loo.

     Yesterday we went to the Home and Garden show in Richmond! Obviously I don't have a place of my own to buy windows and countertops and junk for, but my parents always like to look at new ideas for their house, and Jen and Jason are looking at moving, so they'll likely be doing some upgrading soon as well. Me and Amanda just went along to look at pretty kitchens and pick which doorknobs we like best and so on. I snapped a few hasty cell-phone pictures so if nothing else, I can prove I was there. Never know when you'll need an alibi! Just kidding, I don't know what I took that to a dark place. Anyway, check it out. 


     This was a booth for a company that refinishes countertops, bathtubs, sinks and the like. As Jen put it when she spotted this demo, "Oooh, that's compelling." 


     I was quite smitten with this little corner. Those glass-front cabinets, the lighted inside, even the blue mason jars and teapots they had grouped up top; I wanted this corner to be in my pretend house.


     A nice display of some hardscaping. That fountain is what I'd put in my yard if I woke up and realized I was a fancy noble lady or something. 


     One of my favorite parts, because I have low standards for what I consider a good time: looking at this big ol' wall of drawer pulls and picking favorites. I liked the antiqued floral-y ones in the bottom right rectangle, but check out the RHINESTONE handles in the top left. Can you even imagine having those in your kitchen? All the little spaces would be crusted with bread dough and peanut butter within a week if I was around. But they sure are pretty for...people who don't cook in their kitchens, I guess?

Anyway, it was super fun to look at stuff and dream about what I'll do with my own house some day. They also give out free candy at like half the booths, so double win for the day!


Wednesday, January 29, 2014

Painted Puppy Cake!

     Now for the second of those custom cake orders I mentioned on Monday: the Painted Puppy Cake! This one was for a little girl's birthday party at a pottery painting place. She wanted a fluffy white puppy, with rainbow layers and a bow. Beyond that, Amanda had the idea to make paint splotches on the pup, like it had gotten into the paint at the party location. I loved the idea, so I ran with it! 


     If you're thinking "Hey, that reminds me of the Kitty cake you did recently!" that's because the birthday girl was there when that cake was presented, and decided she wanted one like it, but a dog instead of a cat. So I went for the same general style (piped white "fluffy" looking frosting all over, cute cartoony eyes), just with some more canine features. The white is my usual favorite buttercream recipe, and the eyes, nose, bow, brush, and paint splotches are all shaped from hand-made fondant. The inside was made of five different colored layers: pink, purple, green, teal, and yellow. I'd show you a picture, but obviously I couldn't slice into it to snap a photo! 

     This one was so fun to make -- with the rainbow layers inside and the splashes of color on top, it was the cake-making equivalent of getting to use all the crayons in the box! 


Monday, January 27, 2014

Thomas the...Cake?

     Today I shall share with you the first of two custom cakes I made recently. I actually had two orders due on the same day, so it was a baking marathon. Many eggs were slain that day, and much food coloring was spilt upon the land. Anyway, this first one was for a first birthday party, and the request was "Thomas the Tank." (Sidenote: is it Thomas the Tank or Thomas the Train? I always thought train, but google says tank, so I guess I'm just stupid? Whatever, it's not like that's technically wrong, he is a train.) 


     This guy is the main reason I was practicing my fondant coloring skills last weekend; I wanted to make sure I'd be able to get that blue just right. The inside is the white cake that I always recommend for large groups, because it's super delicious and hard not to like.  Then I frosted it with white buttercream and piped on red and yellow accents around the top and bottom edges to play off of the red and yellow fondant in the...lights? and...bottom train-y part? I dunno, I never got into trains. The decorations on the top are entirely  made-from-scratch fondant, except the tiniest bit of black icing piped on for some definition in a few places. I just pieced it together in sections, using a picture for reference. 

     This one was a lot of work (any time there's multiple colors of fondant involved, it's gonna be a long day -- so much kneading! -- but it's good for the arms, so I ain't mad), especially because I was working on a second cake that same day (so lots of "bake this, cool it while that bakes, crumb-coat this, chill it while you crumb-coat that" back and forth) but I'm really pleased with how it turned out and, more importantly, the client was super happy with it! It makes me so happy to think that I contributed in some small way to people making happy memories.


Monday, January 20, 2014

I'm not overly...fond...of fondant. Ba-dum-chhhh.

     Since I've got a few custom cake orders coming up that are going to involve a fair amount of fondant-ing, I thought I'd get some practice in this weekend with making marshmallow fondant from scratch (rather than buying it pre-made, which I've done when I only needed one color) and coloring it myself. I wanted to do a test run for a few particular colors because I have very specific hues in mind, so I figured if I tried them out ahead of time I could get the color ratios right ahead of time so I wouldn't have to experiment and end up with weird gray slabs of sugary ick when it's go time for the real cakes. Let's see how it turned out! 

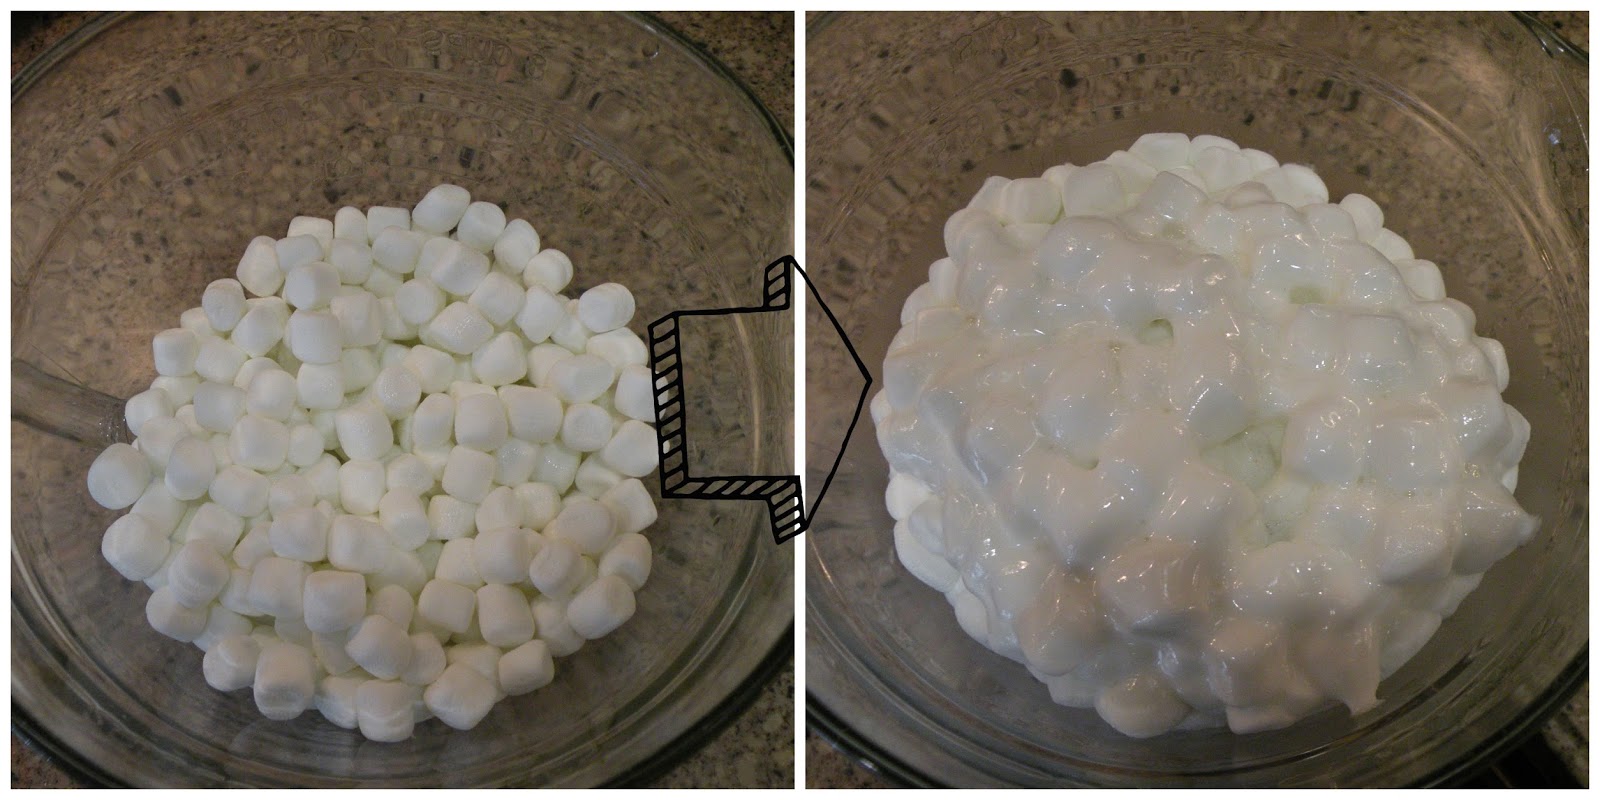
     First thing's first: I melted about 4 cups of marshmallows with two tablespoons of water in the microwave. This part's fun, because it's like you're exploding Mr. Staypuft. I mean, hopefully not actually exploding, the marshmallows should just puff up and then melt together into sweet sugary goo. 


     Then I added 4 cups of powdered sugar, one cup at a time, and stirred it up until I couldn't stir no' mo'. Once I had a big sugary sticky mess that I couldn't do a damn thing with, I dumped it out onto a cutting board and kept kneading until I'd incorporated all the sugar. It took a while, but eventually I just looked down at it and said "Holy crap, that's beautiful!" 


     Then comes the fun-but-also-a-little-miserable part: adding color. It's fun in that it's cool to see the colors develop as you knead; they come through in streaks so the fondant gets kind of marbled before it gets fully colored. It just takes a LOT of kneading. I mean a lot. So this was the part where I always think that fondant is kind of a bitch. 


     That one ended up being black; you can see the coloring folded into the inside at the top left of the...glob? What's a nicer-sounding word for glob? I dunno, you think of one and pretend I wrote that. 

     Here's the colors I ended up with, including the finished black fondant on the right.  


     I don't know why I didn't think to take this picture before I wrapped them up in plastic wrap, but here we are. No regrets. Ok, some, but minimal. Minimal regrets! Anyway, you can see that the black actually turned out delightfully dark, which pleasantly surprised me. I wrapped them up and vacuum sealed them, since I have no real use for them but didn't want to throw all my hard work away, but who knows if they'll even keep overnight. It's all just practice anyway, so I'm not too worried. And in case you were wondering, they did turn out tasting much better than the store-bought pre-made stuff! Taste is my highest priority when I make cakes (obviously I want it to look amazing, too, but if it looks amazing and tastes weird, what was the point?), so I'm quite pleased! 


Friday, January 3, 2014

Amanda's Favorite Cookies

     This post is exactly what it claims to be: the recipe for Amanda's favorite cookies. I don't make them that often because I prefer drop cookies to cutout cookies, but sometimes she gets to pestering me about it and won't stop until I make them. So I figured I'd share them with you! They're kind of a strange cookie: chocolatey through and through, but very light and flaky in texture, almost closer to a pastry than a cookie. 


     The original recipe is out of a book my friend Elise gave me once (it's this one right here, if you're curious). They're called "pressed chocolate cookies" in the book, but I always call them chocolate envelopes, because that's more descriptive. Read on and I'll show you how I make them! 

     First up, gather your ingredients. 


     You'll need:

     1 1/3 cups flour

     2 tablespoons cocoa powder
     2/3 cup softened butter
     3/4 cup sugar
     1 egg yolk
     chocolate discs, chunks, or whatever else you want to cram inside the cookies

     First up, preheat the oven to 375 degrees, and grease a baking sheet with butter or cooking spray. Then mix the flour and cocoa together in a medium bowl. In another bowl, a large one this time, beat together the sugar and butter, then add in the egg yolk and beat some more. When it's all combined, add the dry ingredients from the medium bowl to the large bowl and beat until everything is nicely mixed up. The dough will look really crumbly. Like this!  


     Now, the original recipe says to refrigerate for at least 30 minutes, but I think they put that in there just to screw with everybody. Don't do that. This dough is so crumbly and dry that if you chill it, it will never, ever roll out without cracking apart. You have to do the opposite and warm it up a bit by kneading it and squishing it with your hands until it starts to hold together. Once it holds its shape, throw down some flour and start rolling it out. It's very important to also flour your rolling pin, because the dough can start to pull up and tear if you're not very gentle with it. It's kind of a pain in the tush, but suffering makes the cookies taste better. Once the dough is rolled out pretty thin (1/8 of an inch if you can get it there, thicker if you get tired of rolling and decide where it's at is good enough), cut a whole bunch of circles out with the cookie cutter/glass of your choice. I use a little biscuit cutter. 

See how the dough stuck to the counter a little in the missing cookie's spot? Flour, flour, flour your surfaces, friends. Don't be like me! 

     Once they're all cut out, it's assembly time! Just place your chocolate disc (or whatever else you're using) in the center, put another cut-out on top, then press the edges together with a fork to seal them. 


     Plop 'em on the prepared baking sheet and bake them for about 8 minutes. I always start with 7 and then keep a close eye on them, because I like my cookies to essentially just be heated-up dough, but if you like a crisper cookie, let them go a little longer. When they've spread out just a bit and the edges start to set, take them out and let them cool on a wire rack. They'll still seem a little underdone when you first take them out, but they'll continue to set juuuuust enough while they cool, which is what makes their divinely odd gooey-but-kind-of-crispy texture. 

     Then they're done! Enjoy them while you can, because a batch only makes about a dozen, so they go fast.